Getting your passport size photo right can feel a bit like preparing for a tiny but very official audition. The rules are strict, and for good reason—passport photos are used worldwide as a form of identification, and they need to be clear, consistent, and standardized. Yet, for many people, posing for that tiny 2×2-inch photo becomes stressful. Should you smile? Should you look serious? How do you sit? Don’t worry—this guide breaks it all down so you know exactly how to pose and what facial expression to use for a perfect, government-approved passport photo.
Why Posing and Expression Matter for Passport Photos
Getting your passport size photo right is more than just standing in front of a camera and hoping for the best. Passport photos are an official form of identification used not just within the United States, but around the world. Immigration officers, border control agents, and even airline staff rely on these photos to verify your identity quickly and accurately. Because of this, every aspect of your pose, expression, and even lighting is scrutinized. A small mistake—like tilting your head slightly or squinting—can trigger a rejection or delay your passport approval, which can be frustrating if you have travel plans coming up.
The US State Department has set strict biometric guidelines for passport photos to ensure that facial recognition technology can identify individuals efficiently. This means that your face must be fully visible, well-lit, and positioned correctly in the frame. Even minor deviations, such as an uneven gaze, a tilted chin, or a subtle frown, can interfere with automated systems. These systems compare your photo to databases containing millions of images, so consistency and clarity are critical. Your pose and expression aren’t just for aesthetics—they serve a practical purpose in keeping your identity verifiable across borders.
Facial expression is one of the trickiest parts for many people. It’s tempting to smile naturally or tilt your head to appear more relaxed, but passport guidelines require a neutral expression. A neutral face with closed lips ensures that facial features like the shape of your eyes, mouth, and jawline are clearly captured. This level of precision reduces the risk of misidentification and ensures that your photo will remain valid for years. It’s less about looking stern and more about providing a clear and accurate representation of yourself.
Finally, mastering your pose and expression is a way to combine compliance with confidence. Knowing how to position your head, keep your eyes forward, and maintain a calm expression reduces stress during the photo-taking process. It also increases the likelihood that your passport application will be approved on the first try, saving you time and money. Treating the process seriously doesn’t make it intimidating—it simply makes you prepared. By understanding why every detail matters, you can approach your passport size photo with a sense of control rather than anxiety.
The Golden Rule: Neutral Expression
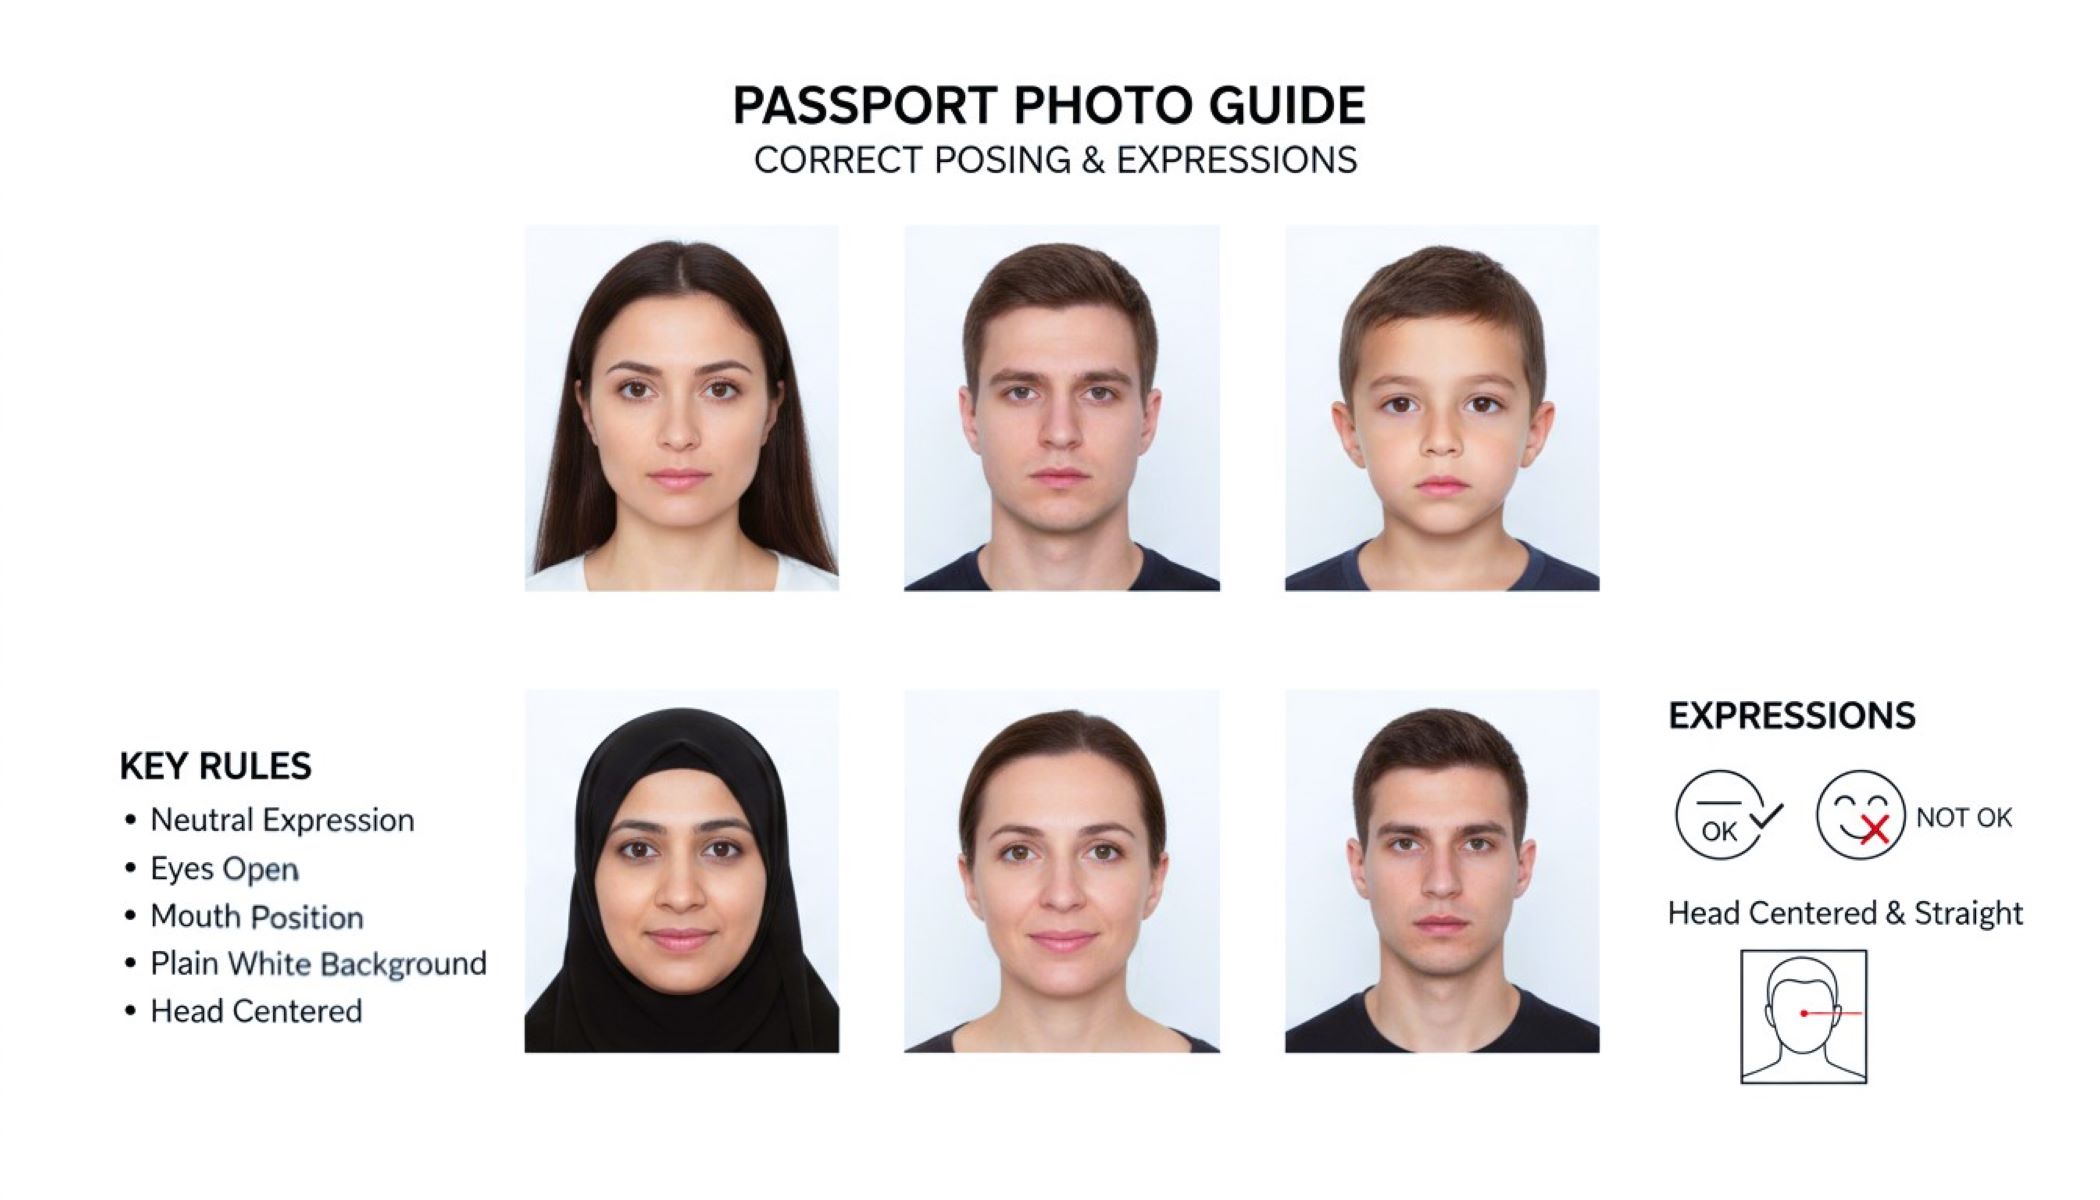
- Maintain a calm and relaxed face at all times.
- Keep your lips closed; avoid showing teeth or smiling broadly.
- Ensure your facial muscles are not tensed; your jaw should be relaxed.
- Avoid exaggerated expressions, such as frowning, raising eyebrows, or puckering lips.
- Keep your eyes open and fully visible, looking straight at the camera.
- Do not tilt your head forward, backward, or to the sides.
- Avoid leaning in or out; your face should be centered in the frame.
- Relax your forehead and avoid scrunching it, even slightly.
- Keep your cheeks neutral—no puffing or sucking them in.
- Ensure your expression is natural and approachable without being overly emotional.
- Keep your chin at a neutral angle; avoid tilting it up or down.
- Maintain even breathing to prevent subtle changes in facial tension.
- Keep your gaze steady and avoid looking away from the lens.
- Avoid any gestures or movements that alter the natural shape of your face.
- Make sure your hair does not cover your face, eyes, or eyebrows.
- Ensure your overall expression is consistent with biometric requirements for facial recognition.
- Check in a mirror before the photo to confirm a relaxed, neutral appearance.
- Avoid overthinking your look; a natural, calm expression is always best.
- Be aware that even a slight smirk or quirky expression can lead to rejection.
- Treat your face like a blank canvas—simple, neutral, and true to your natural appearance.
Head Position: Keep It Straight
| Tip | Description | Common Mistakes | Why It Matters | Quick Reminder |
| Center your head | Position your head so it is perfectly centered in the frame | Tilting to one side or leaning forward/back | Ensures symmetry and proper biometric alignment | Imagine an invisible string pulling your head straight up |
| Face directly forward | Keep your face pointing straight at the camera | Turning slightly left or right | Helps facial recognition technology identify you accurately | Nose should point at the lens |
| Keep ears visible | Ensure both ears are fully visible | Hair covering ears or head angled | A clear side profile helps with identification | Tuck hair behind ears if needed |
| Maintain neutral tilt | Avoid tilting your chin up or down | Looking up at the ceiling or down at the floor | Keeps eyes and facial features aligned with guidelines | Chin should be level with the camera |
| Align with shoulders | Head should align naturally with relaxed shoulders | Leaning head forward or backward | Prevents distortion in the photo | Stand or sit tall for correct posture |
Eye Contact Is Non-Negotiable
Eye contact is one of the most critical elements of a passport photo. Your eyes must be fully open, looking directly at the camera, and free from any obstructions. Squinting, blinking, or looking away can result in your photo being rejected, which could delay your passport application. When you use a reliable passport photo maker, you can preview your eye alignment and ensure your gaze is perfectly straight, helping to avoid common mistakes that many applicants make.
For people who wear glasses, the rules are even stricter. Since 2016, the US State Department does not allow glasses in passport photos, unless there is a valid medical reason supported by a signed doctor’s statement. Using a passport photo maker can help you visualize how your photo will look without glasses and adjust your pose accordingly. This ensures that your eyes remain fully visible and compliant with all official guidelines.
Proper eye contact is not just about following the rules—it also affects how clearly your face can be recognized. Facial recognition technology relies heavily on the position and visibility of your eyes, and any deviation can interfere with accurate identification. A high-quality passport photo maker allows you to test different angles, lighting, and distances to achieve the most precise eye alignment, giving your photo a professional finish without needing multiple retakes.
Maintaining consistent eye contact also contributes to a calm, neutral expression, which is another requirement for a valid passport photo. By focusing on your gaze and relaxing your facial muscles, you can achieve a natural and neutral look that meets government standards. Whether you take the photo at a studio or use an online passport photo maker, ensuring your eyes are fully open and centered will significantly increase the likelihood that your photo will be accepted the first time.
Mouth Position: Closed Is Best
- Keep your lips gently closed and relaxed at all times.
- Avoid showing your teeth, even for a slight smile.
- Ensure your lips are not pursed, puckered, or tense.
- Maintain a neutral, natural line without stretching or exaggerating.
- Avoid any form of smirk or crooked smile.
- Keep your mouth relaxed so your jawline remains clear and visible.
- Refrain from biting your lips or pressing them together tightly.
- Maintain a calm expression that doesn’t distort your facial features.
- Avoid exaggerated facial expressions that change the shape of your mouth.
- Ensure the corners of your mouth are relaxed, not turned up or down.
- Keep your lower face in proportion with the rest of your facial features.
- Check in a mirror before taking your photo to confirm a neutral mouth position.
- Avoid talking or moving your lips during the photo.
- Ensure your lips do not cover your teeth or mouth in any way.
- Practice a neutral mouth expression in advance to reduce tension.
- Remember that even a faint smile can sometimes alter the natural shape of your mouth; err on the side of neutrality.
- Keep your mouth aligned with your eyes and nose for a balanced composition.
- Treat your mouth position as part of your overall calm, neutral pose.
- Avoid pressing your lips against your teeth or making subtle movements that may appear in the photo.
- Think of your mouth as a relaxed line that complements a neutral and professional passport photo.
How to Sit or Stand for the Photo
| Tip | Description | Common Mistakes | Why It Matters | Quick Reminder |
| Sit or stand upright | Keep your back straight and posture tall | Slouching or leaning sideways | Ensures proper alignment and prevents distortion | Think tall and confident |
| Align body square to camera | Face the camera directly without angling | Angling like a portrait or turning shoulders | Maintains symmetry and meets biometric requirements | Imagine a vertical line from head to shoulders |
| Relax shoulders | Keep shoulders down and natural | Tense or raised shoulders | Prevents a stiff appearance and ensures a natural photo | Shake out tension before the photo |
| Avoid leaning forward/back | Keep your face at proper distance from lens | Leaning in or backward, creating uneven proportions | Ensures correct framing and prevents rejection | Stand or sit in a neutral, balanced position |
| Maintain natural pose | Let your body feel comfortable but still aligned | Overly stiff or exaggerated posture | Gives a calm and professional look while complying with rules | Imagine being politely attentive for a formal photo |
Lighting and Shadows
Proper lighting is one of the most crucial elements for a successful passport photo. Even if your pose, head position, and facial expression are perfect, poor lighting can ruin the entire photo. Uneven light or harsh shadows across your face or the background can cause your application to be rejected. It is essential to ensure that your face is illuminated evenly from all angles so that every feature, from your eyes to your jawline, is clearly visible.
The light should be soft and evenly distributed across your face. Avoid harsh overhead lighting, which can create shadows under the eyes, nose, and chin. These shadows not only affect the aesthetic quality of your photo but also interfere with biometric recognition systems that require clear visibility of all facial features. By using diffused or natural lighting, you can minimize unwanted shadows and highlight your face in a neutral, balanced way.
Natural daylight is often the best option when taking a passport photo, as it provides soft, even illumination that is flattering and easy to work with. If natural light isn’t available, a well-lit indoor setup with balanced lighting from the front works just as effectively. Using multiple light sources or a reflector can help eliminate shadows and create a clear, professional-looking photo that meets all official requirements.
Finally, lighting also affects the background. A plain white or off-white background is required, and uneven light can create visible shadows on it, which may lead to photo rejection. Whether you are using a studio, home setup, or a passport photo maker, always check that your face and the background are evenly lit. Proper lighting not only ensures compliance with government standards but also enhances your overall appearance, making the passport photo clear, professional, and acceptable for official use.
Optimizing Your Overall Passport Photo Look
Creating the perfect passport photo isn’t just about neutral expressions and proper lighting. There are several additional considerations that can make a significant difference in whether your photo is accepted on the first try. From small adjustments to preparation techniques, paying attention to these details ensures a smoother application process.
- Ensure your skin is clear and free from shiny spots; a light, even complexion helps the camera capture facial features accurately.
- Remove any heavy makeup that alters your natural appearance; subtle, natural tones are acceptable.
- Keep hair neatly styled and away from your eyes, forehead, and ears to ensure nothing obstructs your face.
- Avoid overly bright or reflective clothing that can create glare or affect contrast with the background.
- Choose colors that contrast gently with the background, like soft blues, greens, or darker neutrals.
- Eliminate accessories that cover your face, such as large earrings, headbands, or scarves, unless required for religious reasons.
- Ensure your neck and shoulders are visible and not hidden under high collars or thick scarves.
- Maintain relaxed posture from head to torso; tension in your body can translate into a stiff, unnatural photo.
- Practice a calm, natural look in front of a mirror before taking the photo to identify any small adjustments.
- Adjust camera height so it aligns with your eyes, preventing unnatural angles or distorted features.
- Avoid shadows on your face caused by nearby objects or uneven light sources.
- Use a plain, uncluttered background with no textures, patterns, or colors that may distract from your face.
- Keep facial expressions consistent with guidelines; minor adjustments can make the photo appear more confident and natural.
- Make sure your ears, eyebrows, and jawline are clearly visible for accurate identification.
- Review your photo immediately after taking it, checking for alignment, lighting, and overall compliance with requirements.
- Avoid last-minute changes in hair, clothing, or posture that may disrupt the balance of your photo.
- Remember that every small detail contributes to a professional, government-compliant passport photo.